I recently moved my old Jekyll based blog
(http://hawkins.io) to Ghost
Pro. Ghost Pro blogs cannot run on the
apex domain (slashdeploy.com), so I
deployed my new blog to www.slashdeploy.com. However I still wanted a
redirect from the apex domain to www over HTTP and HTTPs. I wanted a
free, no-code and no-infrastructure solution on AWS. The solution is
an Application Load Balancers and Route53 DNS.
You may be thinking the same may be accomplished with an S3 website. That worked well enough only for HTTP. I could not get it working with HTTPs. The ALB redirect rules felt more understanable and thus straight forward compared to an S3 website. Using an ALB now also provides an ingress control point for future requirements as an added bonus. The setup is simple and requires no-code. Here’s the summary:
- Create a certificate
- Create a security group in the default VPC (no need to create a new one for this)
- Create an Application Load Balancer
- Add a listener for port 80 that redirects to
www.your-domain.com - Add a listener on port 443 using the certificate arn from step 1 that redirects to
www.your-domain.com - Create an
Arecord with anALIASto the ALB from step 3
Using AWS is not the best solution if you aren’t already using AWS. Services like Namecheap may also handle this redirect for you. I opted for AWS because AWS manages everything already for this domain.
Step One: Create a Certificate
Step one: create a new certificate using Certificate Manager. You’ll be prompted to allow AWS to create a new Route53 record to verify domain ownership. The creation and provisioning process took about 10 minutes. You can follow the wizard here, no special actions required. Copy the ARN for later.
Step Two: Create a Security Group
Security Group Ingress for port 80 & 443 allowed from anywhere.
Step Create a new security group that allows traffic on port 80 and 443.
Step 2: Create a new Application Load Balancer
This was the most confusing step for me since it was my first time creating an ALB. The wizard threw me off. The wizard cannot create redirects responses, so you’ll need to use dummy values and clean up infrastructure related. Select certificate on step 2 and security group on step 3. Step 4 requires dummy values. Create a target group that uses an IP. That’s enough to step through the rest of the wizard.
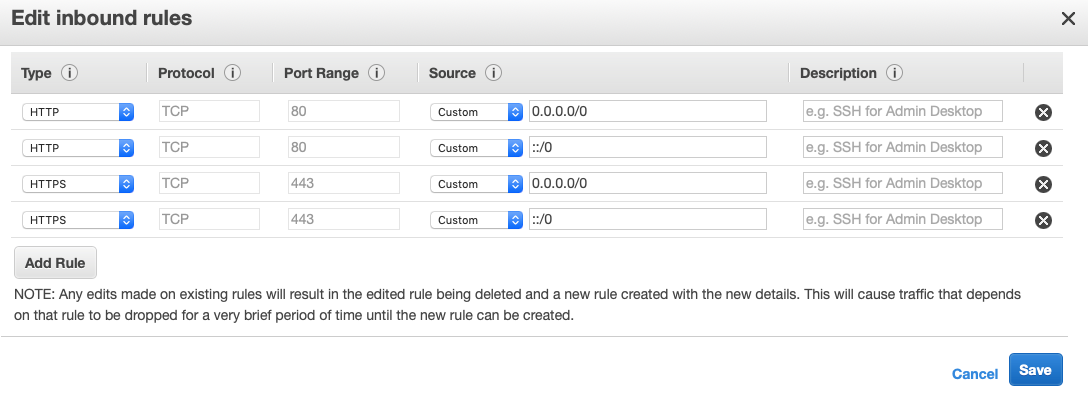
Step 3: Configure ALB Redirect Responses
Now head back to the Load Balancers section in the EC2 console. Edit
the rules for each port to set host to www.#{host}. I redirect HTTP
to HTTPS in my example. The rules should look similar to this by the
end:

Final redirect rules.
Now you want to test with curl using the ALB’s CNAME:
$ curl -v 'slashdeploy-apex-399073728.us-east-1.elb.amazonaws.com'
* Rebuilt URL to: slashdeploy-apex-399073728.us-east-1.elb.amazonaws.com/
*   Trying 34.195.39.185...
* TCP_NODELAY set
* Connected to slashdeploy-apex-399073728.us-east-1.elb.amazonaws.com (34.195.39.185) port 80 (#0)
> GET / HTTP/1.1
> Host: slashdeploy-apex-399073728.us-east-1.elb.amazonaws.com
> User-Agent: curl/7.54.0
> Accept: */*
>
< HTTP/1.1 301 Moved Permanently
< Server: awselb/2.0
< Date: Mon, 21 Jan 2019 15:57:20 GMT
< Content-Type: text/html
< Content-Length: 150
< Connection: keep-alive
< Location: https://www.slashdeploy-apex-399073728.us-east-1.elb.amazonaws.com:80/
<
<html>
<head><title>301 Moved Permanently</title></head>
<body bgcolor="white">
<center><h1>301 Moved Permanently</h1></center>
</body>
</html>
You can also expirement by changing the Host header and examining
the Location header in the response. Here’s an example:
git:feature/datadog >> curl -H 'Host: slashdeploy.com' -v 'slashdeploy-apex-399073728.us-east-1.elb.amazonaws.com'
* Rebuilt URL to: slashdeploy-apex-399073728.us-east-1.elb.amazonaws.com/
*   Trying 34.200.150.221...
* TCP_NODELAY set
* Connected to slashdeploy-apex-399073728.us-east-1.elb.amazonaws.com (34.200.150.221) port 80 (#0)
> GET / HTTP/1.1
> Host: slashdeploy.com
> User-Agent: curl/7.54.0
> Accept: */*
>
< HTTP/1.1 301 Moved Permanently
< Server: awselb/2.0
< Date: Mon, 21 Jan 2019 15:58:32 GMT
< Content-Type: text/html
< Content-Length: 150
< Connection: keep-alive
< Location: https://www.slashdeploy.com:80/
<
<html>
<head><title>301 Moved Permanently</title></head>
<body bgcolor="white">
<center><h1>301 Moved Permanently</h1></center>
</body>
</html>
Step 4: Configure Route53 DNS
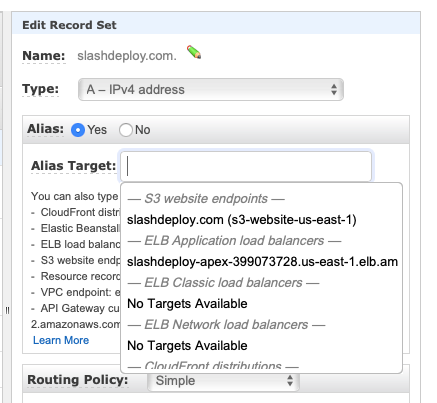
Open your domain’s hosted zone. Create a new A record or edit the
existing one to use an alias. Your ALB should appear in the dropdown.
Save the record and wait for DNS to propagate. Done!